

Here is your simple “How to Upgrade vSAN with best practice guide ?” . I have been asked by a lot of people recently regarding vSAN upgrades sequence , questions will generally be like ,what are my threats? , what are the prerequisites ? , Should I perform upgrades on all hosts together or one node after another ? what are my checks before I proceed to upgrade vSAN hosts? what are the dependencies before I start upgrading my hosts .However you may ask why should I upgrade my hosts / VCenter servers ? The answer to that is very simple , based on certain known issues seen on each version or builds the fixes are provided in the next patches /updates or version releases . It is recommended to get the hosts to latest patches available at the current version if not going forward with the next version release .
If you are running vSAN 6.1 / 6.2 with hosts on 6.0 U1 / 6.0 U2 , it is highly recommended to get to the latest build “ESXi 6.0 U3 see Link and Link“ where multiple known issues with vSAN have been addressed , also considering vSAN 6.6.1 is always a better option . Similarly if you are running a vSAN 6.5 (ESXi 6.5 GA or 6.5 a release) it is recommended to get to the latest build of “ESXi 6.5 U1 see Link and Link” which is vSAN 6.6.1.
Before you start to think about upgrades , we need to make a list of things to be addressed along with your host upgrades , it may be your host BIOS , firmware , I/O Controller firmware and drivers , network card firmware and drivers . This will save you significant time and avoid requirement of multiple reboot if they were put together smartly . I would also high encourage you to go thru VMware official Upgrade Docs here where few additional steps are explained .
Upgrade recipe Pre-Checks
- Check for possible inaccessible objects and VMs in the cluster and log a case with VMware support if you could not find out what those objects were .
- Virtual machine compliance status check.If there were any VMs with Fault-to-Tolerate (FTT) = 0 , do you need them if yes , consider changing the policy to default or any other data redundant policy .
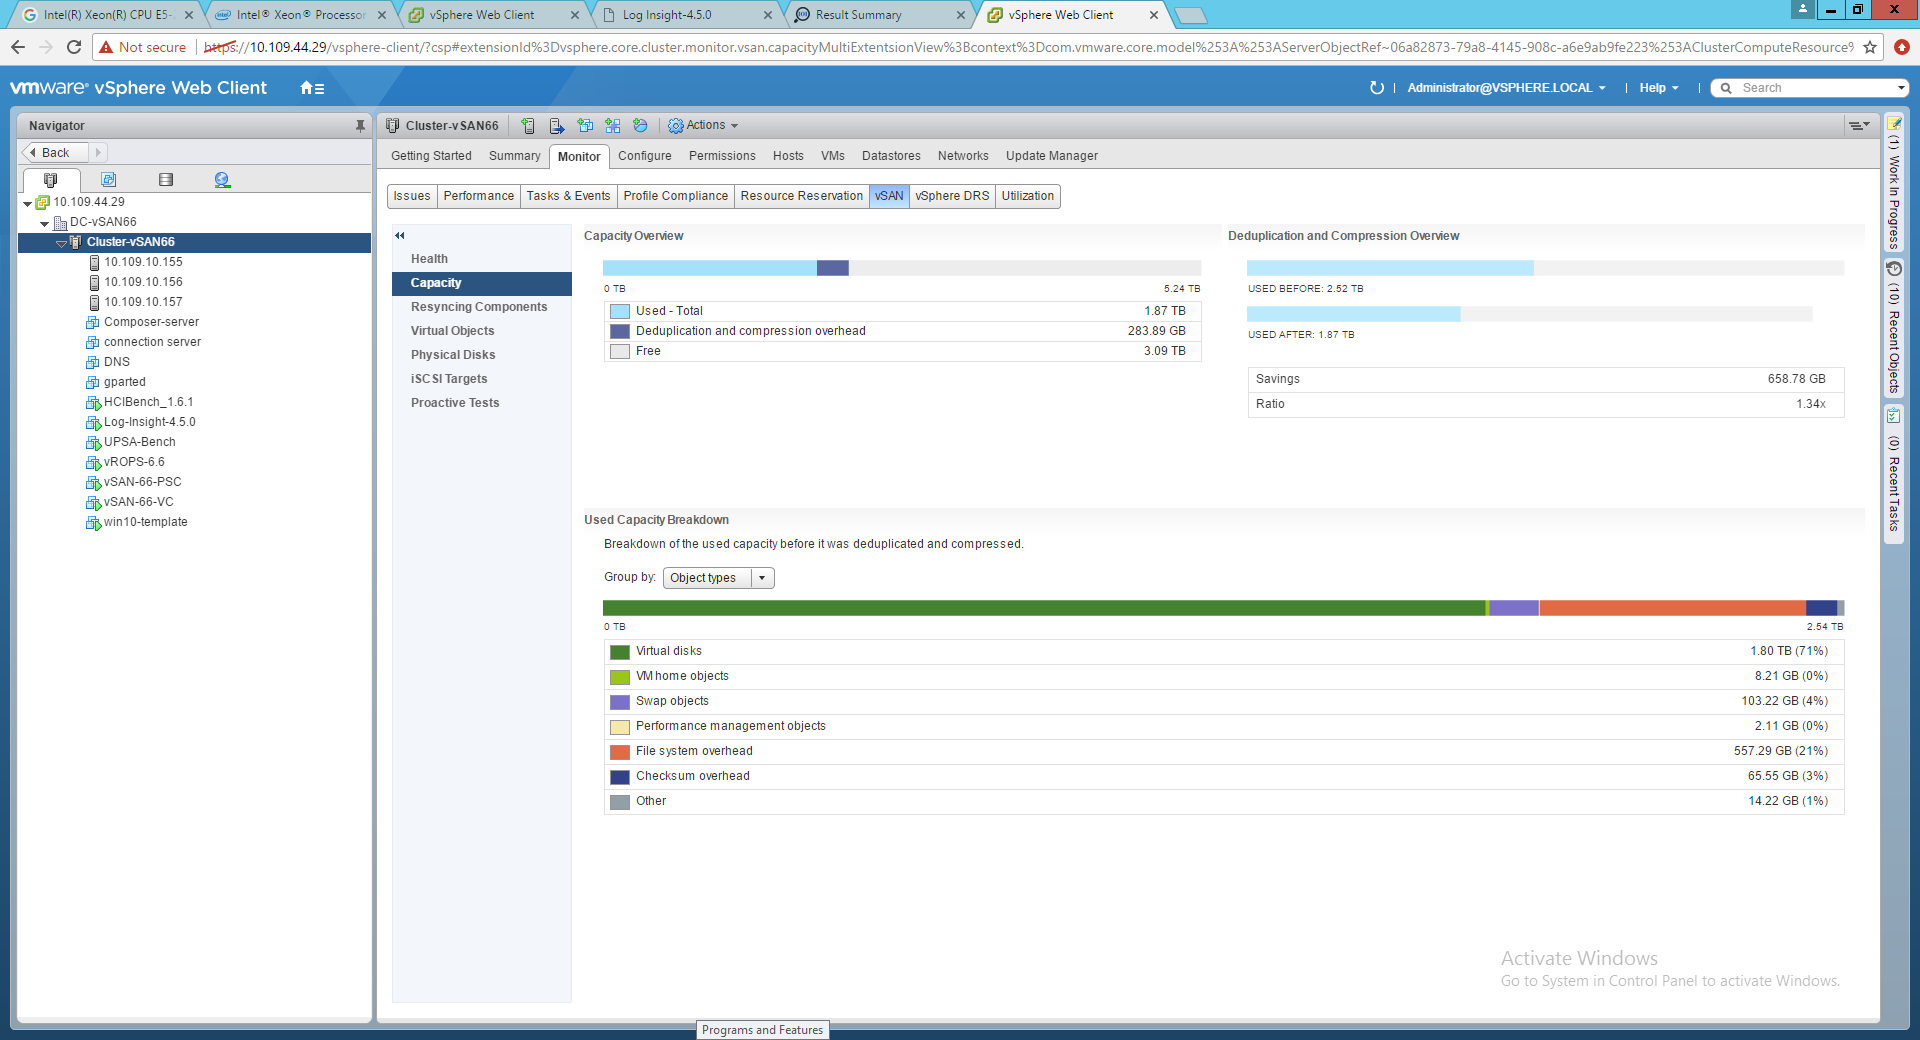
- Check Current utilization of vSAN datastore , Check What would be your Possible Resync/Rebuild data when a host goes down and can I accommodate the data on rest of the host when one host goes down. Also ensure that there are No Current Ongoing Resync before attempting any maintenance mode mask on the cluster .
- Check the Utilization of each disk group and disks , check if they need a Proactive Rebalance .
- Ensure to have the Latest BACKUP for all VMs .
- Check and Verify current Driver and firmware for I/O controller and network card , Disk Firmware (Cache and capacity) .
- Ensure that There is NO Critical Errors on the vSAN health plugin (Note* only 6.2 and above version only has a working health plugin ) , before starting the upgrade process
Upgrade recipe Pre-checks Explained
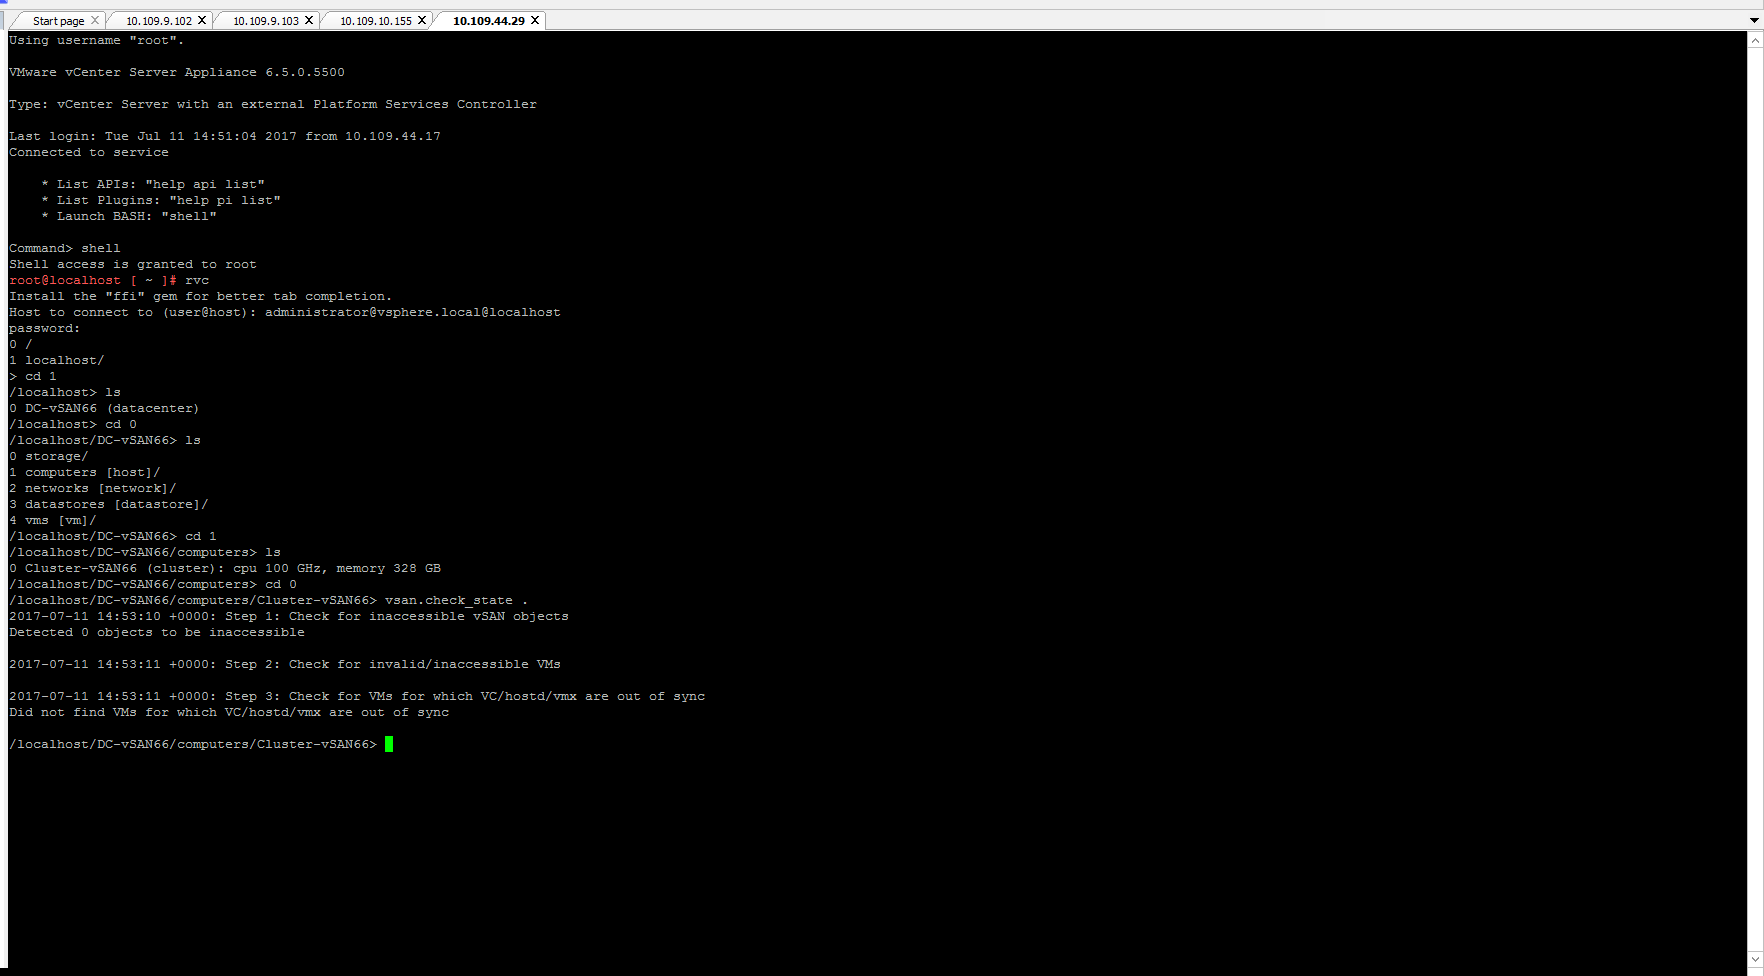
1.Check for possible inaccessible objects and VMs
Easiest way is to go the health plugin (works only if we are 6.2 and above release) to see if there were any inaccessible objects , I however recommend you to use and familiarize with RVC commands as this would be your best friend !!.Its also easy to check the same status from the RVC command line on your vcenter server where your vSAN cluster resides . Please see RVC command line guide here .First log into RVC console (See how to log into RVC) , change directory to the vSAN cluster , next run vsan.check_state to look for any inaccessible objects .

2. Virtual machine compliance status check.
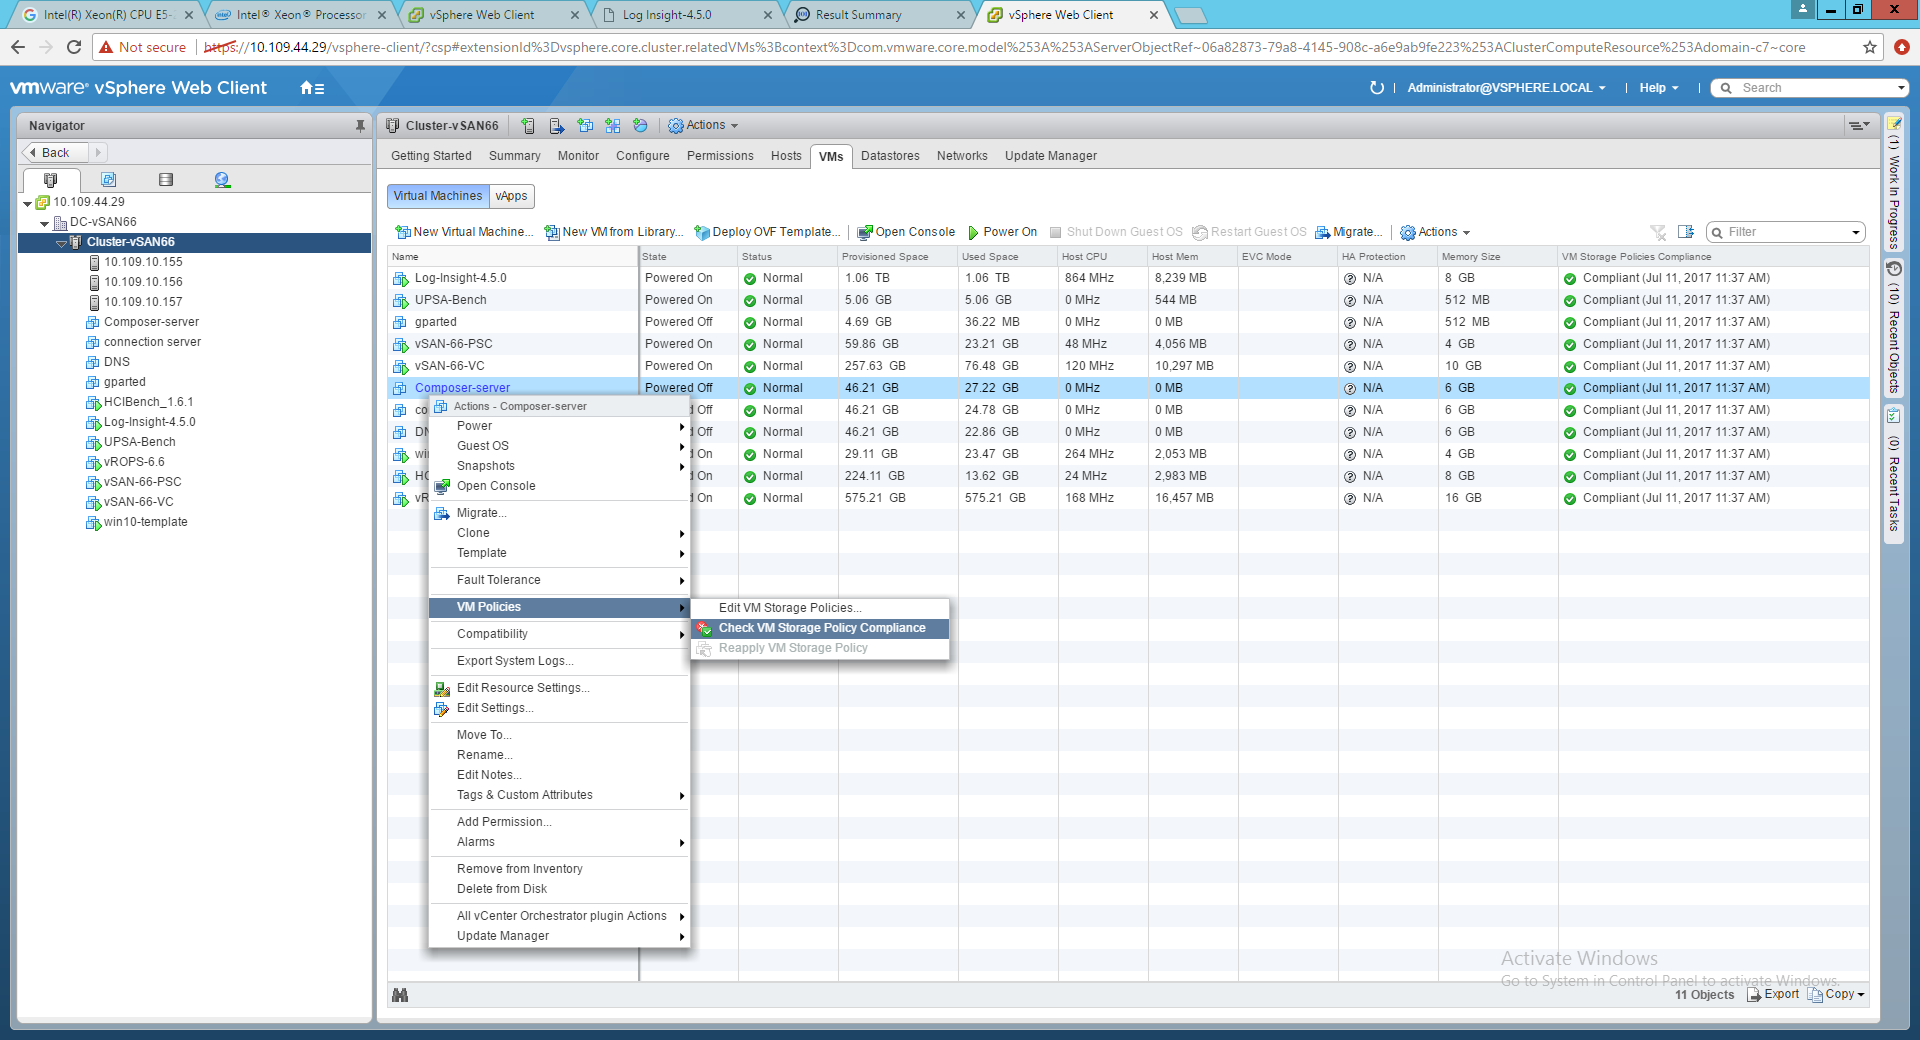
It is very important to ensure that the VMs in the vSAN datastore are complaint with their set policies always . We may miss out some important things and proceeding with upgrades of hosts might have adverse affect if the VMs which were non complaint we may end up in a possible data loss situation . Also if there were VMs which were using FTT=0 policy you may either convert them to vSAN default policy and hit apply if they were required or you can have those VMs deleted to avoid data loss situation . If you find any VMs that were non complaint to their policy however if the objects /components were shown active you may simply check for compliance they should turn green by right click ⇒ VM policies ⇒ check for compliance . If this did not work simply choose re-apply policy and they should go complaint .

3. Check Current utilization of vSAN datastore , Check What if host failure scenario
Ensure that we have enough datastore free space on the vSAN datastore to accommodate data from complete host , since performing upgrades per host basis may trigger a complete resync/rebuild of the host that is under maintenance .Again here RVC is your best friend , run “vsan.whatif_host_failures .” to see vSAN datastore utilization after a host is taken down , also if there were any ongoing resync .

4.Check the utilization of each disk group and disks , check if they need a proactive rebalance .
It is good to check if there were any over utilized disk groups or disks before starting an upgrade procedure . RVC command ” vsan.disks_stats .” at the cluster level shows the disk group current utilization , also the command “vsan.proactive_rebalance_info .” , will show you how much of data needs to be re-balanced between Disk groups and disks .

5. Ensure and take latest backups for all VMs .
We all understand that the upgrades are non-disruptive but “Does it mean nothing can go wrong?” , it is always good to have backups and is a highly recommended per best practices for all VMs
6. Check and Verify current Driver and firmware for I/O controller , Disk Firmware (Cache and capacity) and network card drivers and firmware .
Please note you may not be able to get the current firmware from ESXi , you will need to use your hardware console for the hosts (Dell : iDRAC , HP : ILO , CISCO : KVM , etc) from the respective vendor to determine the firmware for your controller , nic cards and otehr peripherals .
To compare the current driver for compatibility you will need to check VMwareHCL and VMware-vSAN-HCL respectively for your network card /driver and vSAN compatiblity for I/O Controller compatiblity with vSAN version / Host version , recommended driver/firwmare release , SSD / HDD compatibility and recommended version .
Here is an example to find the current controller driver and firmware and compare it with VMware certified driver and firmware, if you found that there was a mismatch , please proceed to correct them per recommended version on the respective HCL guide . You will need to follow similar steps to identify the nic cards in use on the host and their current drivers and firmware , also have them upgraded per HCL guide .Please follow KB Article see verify your current driver and firmware for all nic cards and HBA .
Step1 : Find the current I/O controller in use for vSAN
[root@is-tse-d155:~] esxcfg-scsidevs -a
vmhba0  lsi_mr3   link-n/a  sas.514187706c076000 (0000:02:00.0) Avago (LSI) Dell PERC H730 Mini
vmhba1  vmw_ahci  link-n/a  sata.vmhba1 (0000:00:11.4) Intel Corporation Wellsburg AHCI Controller
vmhba2  vmw_ahci  link-n/a  sata.vmhba2 (0000:00:1f.2) Intel Corporation Wellsburg AHCI Controller
vmhba64 iscsi_vmk online    iscsi.vmhba64 iSCSI Software Adapter
vmhba32 vmkusb    link-n/a  usb.vmhba32 () USB
Step2 : Find the current Driver in use for the controller
[root@is-tse-d155:~] vmkload_mod -s lsi_mr3 | grep Version
 Version: 6.910.18.00-1vmw.650.0.0.4564106
Step3 : Get the VID DID SVID SSID for search your component accurately on the HCL guide
[root@is-tse-d155:~] vmkchdev -l | grep vmhba0
0000:02:00.0 1000:005d 1028:1f49 vmkernel vmhba0
Step4 : Verify the hardware against the VMware vSAN HCL guide
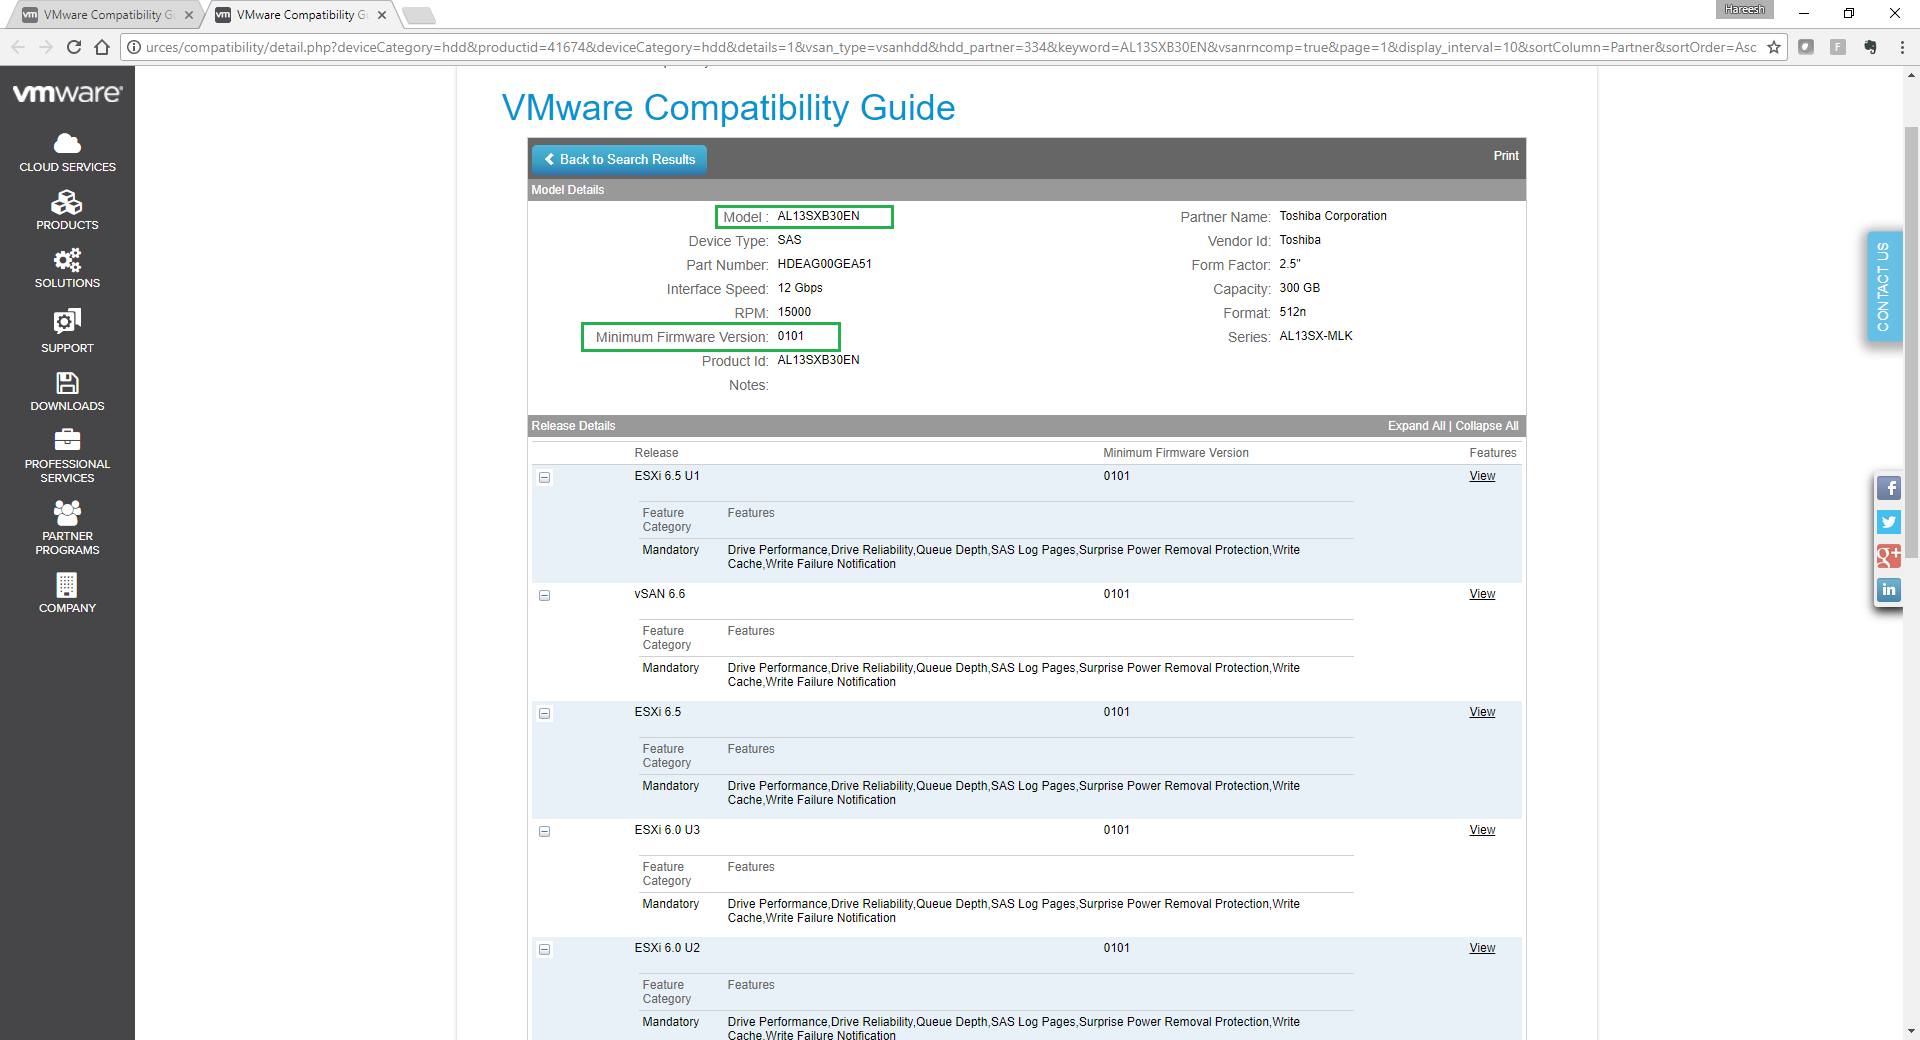
I would prefer the website : https://hcl.captain-vsan.com where we can enter the above details which will direct you to the VMware-vSAN-HCL post you fill in the details for : VID DID SVID SSID , please find the details below . From this step you will now be aware of the recommended driver and firmware combination which is certified for vSAN for the respective controller .


Step5 : Verify the current Firmware against the drives in use for vSAN , if they also need any upgrade
Please do note that firmware revision on drives (both Cache and capacity) should be at par or higher as described on the vSAN-HCL guide and is very critical , as we issues related to race conditions between Controller and disks causing all disks in the host to go into permanent device loss and hosts go into non-responsive state , triggering a massive resync and also cause cluster wide issues like congestion etc..
To validate the current firmware you may use the command esxcli storage core device list and check the drive revision which corresponds to the firmware for the drive and check the vSAN-HCL for the recommended Firmware on the drives .
EX :
[root@is-tse-d155:~] esxcli storage core device list | less

naa.500003969809b581
 Display Name: Local TOSHIBA Disk (naa.500003969809b581)
 Has Settable Display Name: true
 Size: 286102
 Device Type: Direct-Access
 Multipath Plugin: NMP
 Devfs Path: /vmfs/devices/disks/naa.500003969809b581
 Vendor: TOSHIBA
 Model: AL13SXB30EN
 Revision: DK02
 SCSI Level: 6
 Is Pseudo: false
 Status: on
 Is RDM Capable: true
 Is Local: true
 Is Removable: false
 Is SSD: false
 Is VVOL PE: false
 Is Offline: false
 Is Perennially Reserved: false
 Queue Full Sample Size: 0
 Queue Full Threshold: 0
 Thin Provisioning Status: unknown
 Attached Filters:
 VAAI Status: unsupported
 Other UIDs: vml.0200000000500003969809b581414c31335358
 Is Shared Clusterwide: false
 Is Local SAS Device: true
 Is SAS: true
 Is USB: false
 Is Boot USB Device: false
 Is Boot Device: true
 Device Max Queue Depth: 64
 No of outstanding IOs with competing worlds: 32
 Drive Type: physical
 RAID Level: NA
 Number of Physical Drives: 1
 Protection Enabled: false
 PI Activated: false
 PI Type: 0
 PI Protection Mask: NO PROTECTION
 Supported Guard Types: NO GUARD SUPPORT
 DIX Enabled: false
 DIX Guard Type: NO GUARD SUPPORT
 Emulated DIX/DIF Enabled: false
With the Model Number and revision number you see against the disk from above example you may verify the recommended Firmware Revision for the disk . Follow thru the screenshots to verify the disk firmware .


Now you have successfully completed the Pre-upgrade check .
Begin Upgrade Process
Lets discuss the upgrade options , you may choose to do this in two ways , each have their own benefits and cons . You may choose to proceed with either of the them depending on your requirements
- With a full downtime on all the VMs , complete the upgrade on all hosts and then bring up the environment once you have successfully completed the upgrade .
- Upgrade with no downtime, maintenance mode with ensure accessibility
- Upgrade with no downtime, with full data migration
Recipe 1 : Upgrade with Full Downtime
This approach to upgrade is the most preferred in many cases . The steps are very straight forward , all you need is a downtime on all your Virtual machines running residing on the cluster which is about to be upgraded . Please ensure you have followed all pre-upgrade checks before proceeding with these steps
- Step 1 : Shutdown all the virtual machines on the cluster .
- Step 2 : Check for VM storage policy compliance on all the virtual machines and ensure that they are compliant with their assigned VM storage policy . Note : If there were any VMs with FTT=0 (Fault to tolerate) as their policy and if this is considered as a critical VM , please change the policy to Virtual SAN default Policy before attempting any Host Maintenance-Mode .
- Step 3 : Once you have confirmed all VMs are powered and and their compliance check is clean , proceed to put all hosts to MaintenanceMode with NO-DATA-MIGRATION .
- Step 4 : You may now start upgrade all hosts in one go to the build that is recommended / desired , perform all the required upgrades at the hardware layer (BIOS / Firmware etc) .
- Step 5 : Once all hosts are upgraded to the latest build, you may next push the driver vibs for network cards , controller driver and any additional patches for the host post upgrade and take another reboot on all hosts . Now you would have completed the upgrade sequence and you may exit Maintenance Mode on all hosts .
- Step 6 : VMs can now be powered on / brought back to production .
The advantage of this option is that there were be no resync that is required post upgrade on all hosts , hence post upgrade VMs can be brought online and complete vSAN bandwidth is available for VM-storage traffic , the only drawback is the requirement of a downtime , it may not be feasible in all production scenarios .
Recipe 2 : Upgrade with No Downtime
This approach to upgrade is preferred in situations where there can be no down time on the VMs that are running which are mostly mission critical businesses. The steps are explained below , please ensure you have followed all pre-upgrade checks before proceeding with these steps .
- Step1 :Check for VM storage policy compliance on all the virtual machines and ensure that they are compliant with their assigned VM storage policy . Note : If there were any VMs with FTT=0 (Fault to tolerate) as their policy and if this is considered as a critical VM , please change the policy to Virtual SAN default Policy before attempting any Host Maintenance-Mode .
- Step2 : Once all VMs are checked for compliance , you will also need to make sure that there are no ongoing re-sync or re-balance in the cluster with the help of RVC commands on the vCenter server .
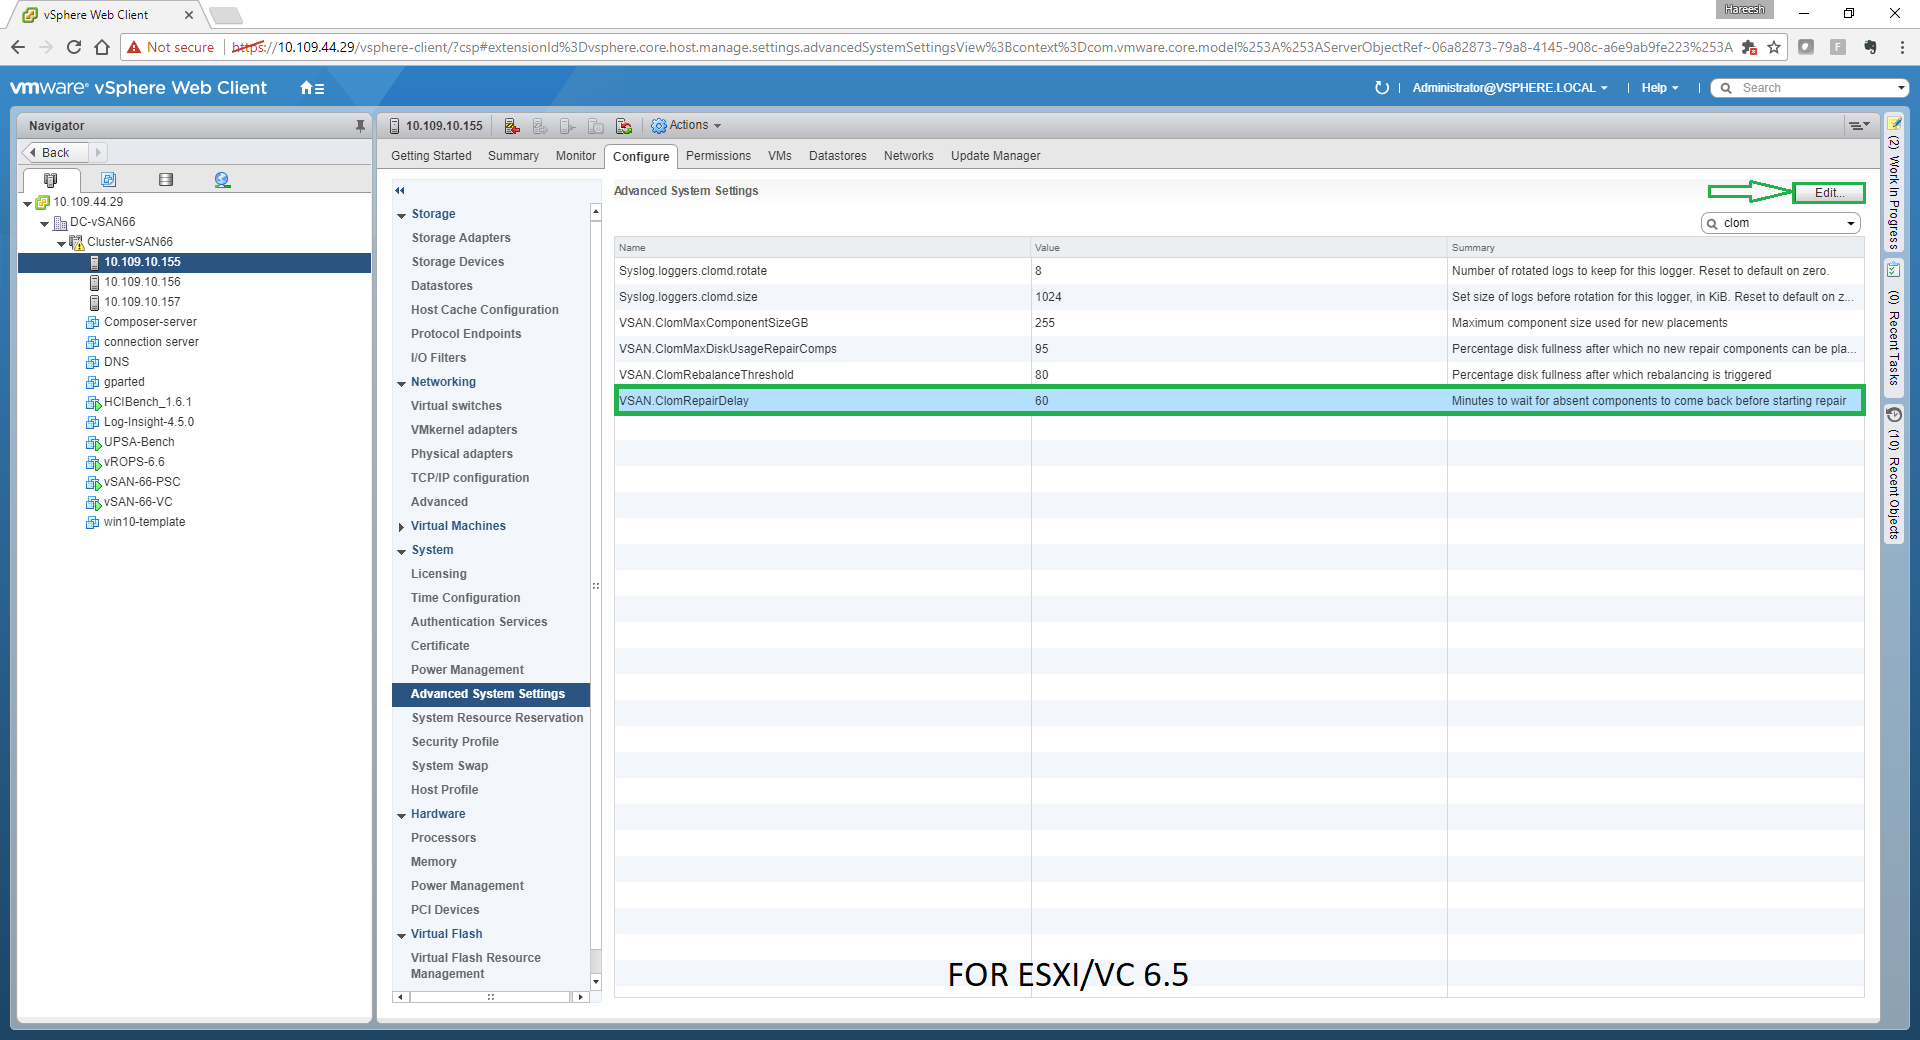
- Step3 : Increase the clom repair delay to two hours (120 mins) ONLY when you think you will need more than one hour to complete the upgrade on one of the host without rebuild kick off which will causing complete resync for the components that are currently residing the host which is about to be placed in maintenance to other hosts in the cluster, proceed to put one host in maintenance mode with ensure accessibility option from the Webclient , if the DRS is not fully automated , you will have to manually move (vMotion) the VMs to other hosts . Below are the screenshots from both 6.0 and 6.5 versions where the wizard might look slightly different while changing the value clom repair delay .


- Step4 : Once the first host is in maintenance mode , you may proceed with all of the upgrades . Start with the host upgrade to the latest build version , proceed with any recommendation on the hardware side for BIOS / Firmware etc (this includes for your I/O controller firmware , SSD/HDD firmware , nic firmware) . Once these upgrades are completed , you may now check if the hosts require any additional patches , driver upgrades for your I/O controller , nics . Push them all in one go and take another reboot . This host can now exit maintenance post all the upgrades and patches .
- Step5 : Post taking the first host out of maintenance , you will need to watch out for possible resync , use RVC command : ” vsan.resync_dashboard .” under cluster directory . If there is an ongoing resync , DONOT attempt maintenance on any of the other hosts , wait for the resync to complete . Please contact VMware technical support if there were anomalies around resync completion or any other issue.
- Step6 : After confirming resync completion (or 0GB to resync) , you may proceed to upgrade the next host following Steps 1 to 5 in a cyclic manner one host after another .
Recipe 3 : Upgrade with No Downtime and full data migration.
This approach to upgrade is preferred in situations company policies which dictates no downtime , data compromise . This is only applicable for more than three node vSAN normal cluster and if in fault domains we should have enough free space on the other hosts within the same fault domain to achieve this.This process is time consuming and will take longer time to complete the upgrade on all hosts as there are multiple resync cycles involved .Please ensure you have followed all pre-upgrade checks before proceeding with these steps
- Step1 :Check for VM storage policy compliance on all the virtual machines and ensure that they are compliant with their assigned VM storage policy . Note : If there were any VMs with FTT=0 (Fault to tolerate) as their policy and if this is considered as a critical VM , please change the policy to Virtual SAN default Policy before attempting any Host Maintenance-Mode .
- Step2 : Once all VMs are checked for compliance , you will also need to make sure that there are no ongoing re-sync or re-balance in the cluster with the help of RVC commands on the vCenter server .
- Step3 : Proceed to put one host in maintenance mode with full data migration , wait for the full resync completion . You may monitor resync using RVC , host will only complete entering maintenance mode post reysnc completion .

- Step4 :Once the first host is in maintenance mode , you may proceed with all of the upgrades . Start with the host upgrade to the latest build version , proceed with any recommendation on the hardware side for BIOS / Firmware etc (this includes for your I/O controller firmware , SSD/HDD firmware , nic firmware) . Once these upgrades are completed , you may now check if the hosts require any additional patches , driver upgrades for your I/O controller , nics . Push them all in one go and take another reboot . This host can now exit maintenance post all the upgrades and patches .
- Step5 : Post taking the first host out of maintenance , you will need to watch out for possible resync , use RVC command : ” vsan.resync_dashboard .” under cluster directory . If there is an ongoing resync , DONOT attempt maintenance on any of the other hosts , wait for the resync to complete .
- Step6 : After confirming resync completion (or 0GB to resync) , you may proceed to upgrade the next host following Steps 1 to 5 in a cyclic manner one host after another .
Note* : There are chances that the vSAN cluster gets network partitioned post upgrade especially from vSAN 6.1 / 6.2 / 6.5 to vSAN to 6.6 as we no longer use multicast from version 6.6 . In these cases you will need to manually add the unicastagent address list on all hosts part of the cluster , I encourage you to see Troubleshooting-Unicastagent
Upgrading vSAN disk Format version
Disk format upgrade may either from the Vcenter webclient or thru RVC , I suggest you first meet the pre-requisite for Disk format upgrade prior to attempting this . I personally prefer RVC to do this , recommend you to refer to the links RVC-Method or Webclient-method . Please also refer to Link for better understanding “on Disk format upgrades and Pre-Requisites” . Refer to How to log into RVC
[contact-form][contact-field label=’Name’ type=’name’ required=’1’/][contact-field label=’Email’ type=’email’ required=’1’/][contact-field label=’Website’ type=’url’/][contact-field label=’Comment’ type=’textarea’ required=’1’/][/contact-form]

